Restoration work already takes time, labor, equipment, and money to complete. Once it’s time to bill, the last thing your team needs is to spend more time fixing an invoice or tracking down missing information.
Getting the mitigation invoice right from the beginning can help avoid that extra work. It should clearly show what your team did and what you’re charging for so whoever receives it can understand the bill they’re reviewing.
To help you get it right the first time, we’ll walk through how to prepare a mitigation invoice from start to finish.
TL;DR
- Mitigation invoices should clearly show the work completed on a property and the charges tied to that work so the recipient can understand what they are being asked to pay.
- The final invoice may differ from the original mitigation estimate when the scope changes or equipment stays on site longer than expected. Job records help account for those differences.
- Photos, moisture readings, drying logs, equipment records, and work authorizations can support the charges by showing what happened during the job.
- Once the invoice goes out, restoration companies still need to track the unpaid balance and follow up when needed, especially since delayed payments can put more pressure on cash flow.
- AR Workflow helps restoration companies keep outstanding mitigation invoices visible, stay consistent with collection follow-ups, and spend less time manually chasing payments.
How Mitigation Invoicing Fits Into the Restoration Billing Process
A mitigation invoice bills for mitigation work completed at a property. Depending on the job, that work could include:
- Water extraction
- Structural drying
- Equipment use
- Demolition
- Cleaning
- Other services needed to limit further damage
The invoice comes after the company has enough information to bill for the work performed. At that point, the team can use its job records to identify what services were completed and what charges belong on the final bill.
This gives the person reviewing the invoice a clearer picture of how the total amount was calculated. If the invoice includes four days of equipment use, for example, the supporting job records should help show which equipment was used and how long it remained on site.
Mitigation Estimate vs. Mitigation Invoice
A mitigation estimate and a mitigation invoice serve different purposes.
As mentioned earlier, the mitigation invoice reflects the work the restoration company is billing for after completion.
A mitigation estimate, on the other hand, is prepared earlier in the process and sets an expectation for what the work may involve and cost based on the information available at the time.
This means the estimate and final invoice will not always match. The team may discover additional affected material during the job, or drying equipment may need to remain on site longer than originally expected.
When that happens, the final invoice should reflect what actually took place. Keeping clear job records makes it easier to account for those differences and show how the completed work compares with what was originally estimated.
This makes the distinction much easier to follow because we're comparing them directly against each other, rather than defining the estimate and then treating the invoice almost like an afterthought.
What Should a Mitigation Invoice Include?
So, what information actually needs to go on a mitigation invoice? Here are the key details to include:
Customer, Property, and Claim Information
Start with the basic information that identifies the job. This includes the customer’s name, property address, invoice number, and any relevant job or project number.
Make sure these details are accurate before moving on. Even a small mistake, such as an incorrect property address or claim number, can make it harder to match the invoice with the correct job or claim.
If an insurance claim is involved, include the relevant claim information available for billing, such as the claim number and insurance carrier information.
With these details in place, anyone reviewing the invoice can more easily identify which property, job, and claim it belongs to.
Services Performed by the Mitigation Contractor
Next, list the mitigation services your team completed and is billing for.
For a water damage restoration job, this might include water extraction, mold remediation, removal of damaged materials, or pack out services when contents need to be removed from the affected area.
Whatever services you include, describe them clearly enough for clients and anyone else outside your company to understand. Internal abbreviations may save space, but they can create confusion for someone who does not use them every day.
If you charge separately for different services, list them separately on the invoice. This makes it easier to see what each charge covers.
Labor, Materials, Pack Out, and Equipment Costs
Now, break down the costs and fees associated with the mitigation work when applicable.
For equipment, identify what was used and how long it remained on the job when duration affects the charge. If your team used air movers or dehumidifiers for several days, for example, the invoice should match the equipment and dates recorded during the job.
Do the same for labor. Show the relevant hours, rates, or other units used to calculate the charge.
Materials should also be described clearly enough for the recipient to understand what they are paying for.
You don't need to add detail that serves no purpose. Include enough information to explain how each charge was calculated and connect it to the work your team completed.
Dates and Payment Information
Then, include the invoice date and the dates relevant to the work being billed.
If a charge depends on time, make that clear too. Equipment billed by the day, for example, should show the duration used to calculate the charge.
Then include the total amount due, your payment terms, and instructions for making the payment.
Record when you send the invoice as well. If the balance remains unpaid, your team will know exactly when the invoice went out and how long it has been outstanding.
What Documentation Should Support a Mitigation Invoice?
The charges on your mitigation invoice should be supported by records from the job. These records help show where those charges came from and give whoever reviews the invoice more information to refer to if they have questions about what they're being asked to pay.
Here's what to include to accomplish that.
Photos and Moisture Readings
Photos can show the conditions your team found at the property and the areas affected by the loss. They can also capture how those conditions changed as the mitigation work progressed.
For water mitigation jobs, moisture readings document moisture levels during the drying process. Moisture maps can make those readings easier to follow by showing where they were taken within the property.
Together, these records help show why certain mitigation work was needed and what conditions your mitigation contractor was responding to.
Drying and Equipment Records
Drying logs keep a record of the drying process as the job progresses. Depending on how your company documents its work, they may show equipment placement, moisture readings, monitoring visits, and adjustments made during drying.
Equipment records become especially important when you bill based on how long a piece of equipment remained on site.
If you're charging for a dehumidifier for four days, for example, your records should support those four days. The same applies to air movers and other equipment billed based on duration.
Keeping this data up to date during the job gives the billing team something concrete to work from when it's time to prepare the final invoice.
Work Authorizations and Job Records
Work authorizations help support a mitigation invoice by showing what work the customer authorized your company to perform. This gives the invoice a record to refer back to when billing for those services.
Job records, on the other hand, help support what actually happened once the work began. If the scope changed or additional work became necessary, the records from the job can show what changed and why those services appear on the final invoice.
This becomes especially important when the final amount differs from the original estimate. Your team can use these records to show how the billed work connects to what was authorized and what was actually completed.
How to Create a Mitigation Invoice
Once you have the job details and supporting documentation ready, you can start putting the invoice together. Here’s how to do it in five easy steps.
Step 1. Review the Completed Scope of Work
Start by reviewing what your mitigation team actually completed.
Compare the original scope or estimate with the final work. This will help you identify anything that changed after the job began.
For example, your team may have discovered additional affected materials or needed to keep drying equipment on site longer than expected. Those changes can affect what ends up on the final invoice.
Reviewing them first helps make sure you're billing for the work that was actually completed instead of simply copying the original estimate.
Step 2. Gather the Supporting Job Documentation
Once you know what you're billing for, gather the records that support that work.
Depending on the job, this could include photos, moisture readings, drying logs, equipment records, or work authorizations. If those charges appear on the invoice, you may also need permits, testing records, or subcontractor proof.
Check those records against the charges you plan to include. If you're billing for several days of equipment use, for example, confirm how long the equipment was on site. If the scope changed, make sure you have records showing what changed.
Doing this now can save your team from having to track down missing information after the invoice has already been prepared.
Step 3. Itemize the Work and Charges
With those details confirmed, you can start adding the work and charges to the invoice.
Keep separate services as separate line items when appropriate. For example, water extraction and several days of drying equipment should not be grouped under one vague charge if you're billing for them separately.
Include the information needed to show how each charge was calculated, such as the quantity, duration, or rate.
Keep the descriptions clear as well. That way, whoever receives the invoice will be able to understand what they're being charged for without having to decipher your company's internal abbreviations.
Step 4. Review the Invoice Against the Job Records
Before you send the invoice, give everything one final check against the job records.
Make sure the services and equipment listed match what your team documented. Check the customer and property information as well, along with any claim details included on the invoice.
Finally, confirm that the charges add up to the correct total.
This gives you a chance to catch an incorrect detail or a charge that needs more explanation before the invoice reaches the recipient.
Step 5. Send the Invoice and Record Its Status
Once everything checks out, send the invoice to the appropriate recipient and record when it was sent.
From there, keep track of whether the invoice has been paid. Sending the bill may finish the invoicing process, but the balance remains part of your accounts receivable (AR) until you receive the money.
Recording the sent date gives your team a clear starting point for tracking how long the invoice has been outstanding. If payment doesn't arrive when expected, you'll also know when it may be time to follow up.
Mitigation Invoice Example
A mitigation invoice will look different depending on the work performed, pricing method, and job. A simple water mitigation invoice might include line items like these:
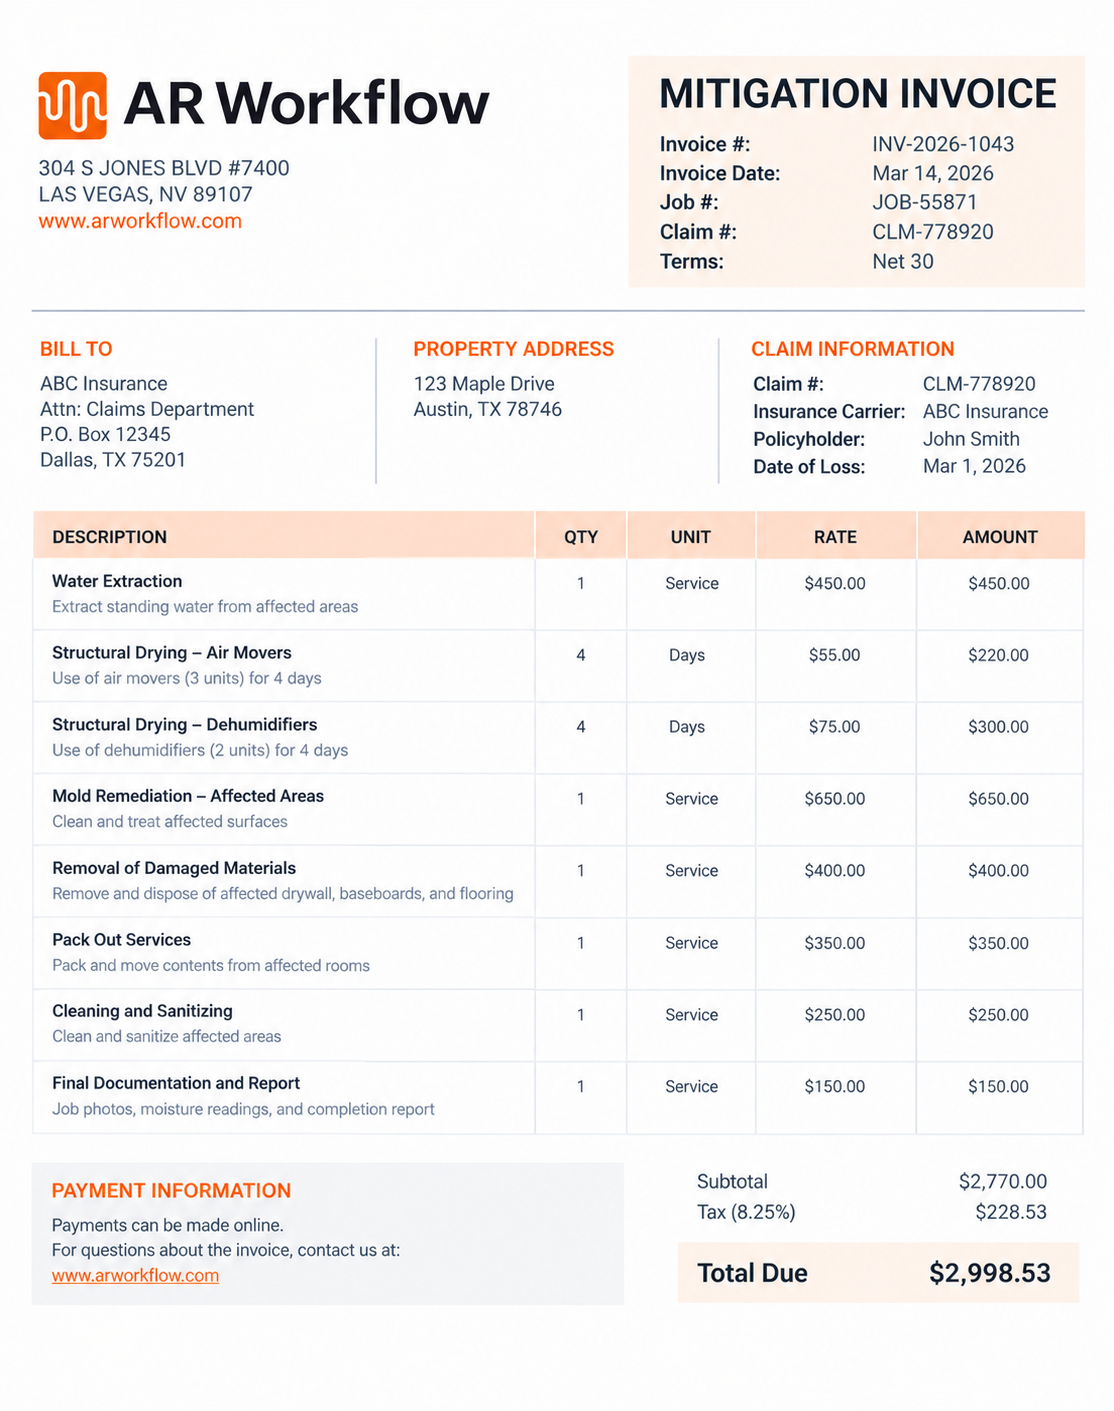
The invoice would also include the customer and property information, relevant claim details, invoice date, total amount due, and payment information discussed earlier.
This example is only meant to show how separate parts of a mitigation job can appear on an invoice. It is not a pricing guide. Actual services, equipment rates, quantities, documentation requirements, and costs will depend on the job and the restoration company's billing practices.
The main point is that each line should connect to work the company can identify in its job records.
How to Keep Track of Outstanding Mitigation Invoices
Sending the final invoice creates a record of what the company is owed. But it doesn't tell the team when that money will arrive.
Unfortunately, for many restoration contractors, that gap can last for weeks. Research from Cleanfax's 2026 Restoration Benchmarking Survey found that most restoration professionals surveyed wait three to eight weeks for insurance payments.
More than 18% even reported waiting longer than eight weeks.
As those unpaid invoices add up, they put nothing but more pressure on your company's cash flow.
The business still has payroll, equipment costs, and other expenses to cover while the money it has already earned from completed mitigation work remains tied up in outstanding invoices.
That's why it's important to know which invoices are still unpaid and how long each balance has been outstanding. Start by recording when an invoice was sent, its payment status, and any follow-up that has already happened.
If someone calls or emails about the balance, keep a record of that discussion as well. Your team can then see what has already been done and which invoices still need attention.
Tracking this information gives the company a clearer accounts receivable process after the bill goes out and helps the team stay on top of the balance until it's resolved.
The Role AR Workflow Plays
The good news is, there's an easier, faster way to track these invoices and stay on top of follow-ups, even when your team is tied up with other important work.
AR Workflow is built exactly for that problem. It gives restoration companies the tools to track outstanding invoices and see where each one stands.
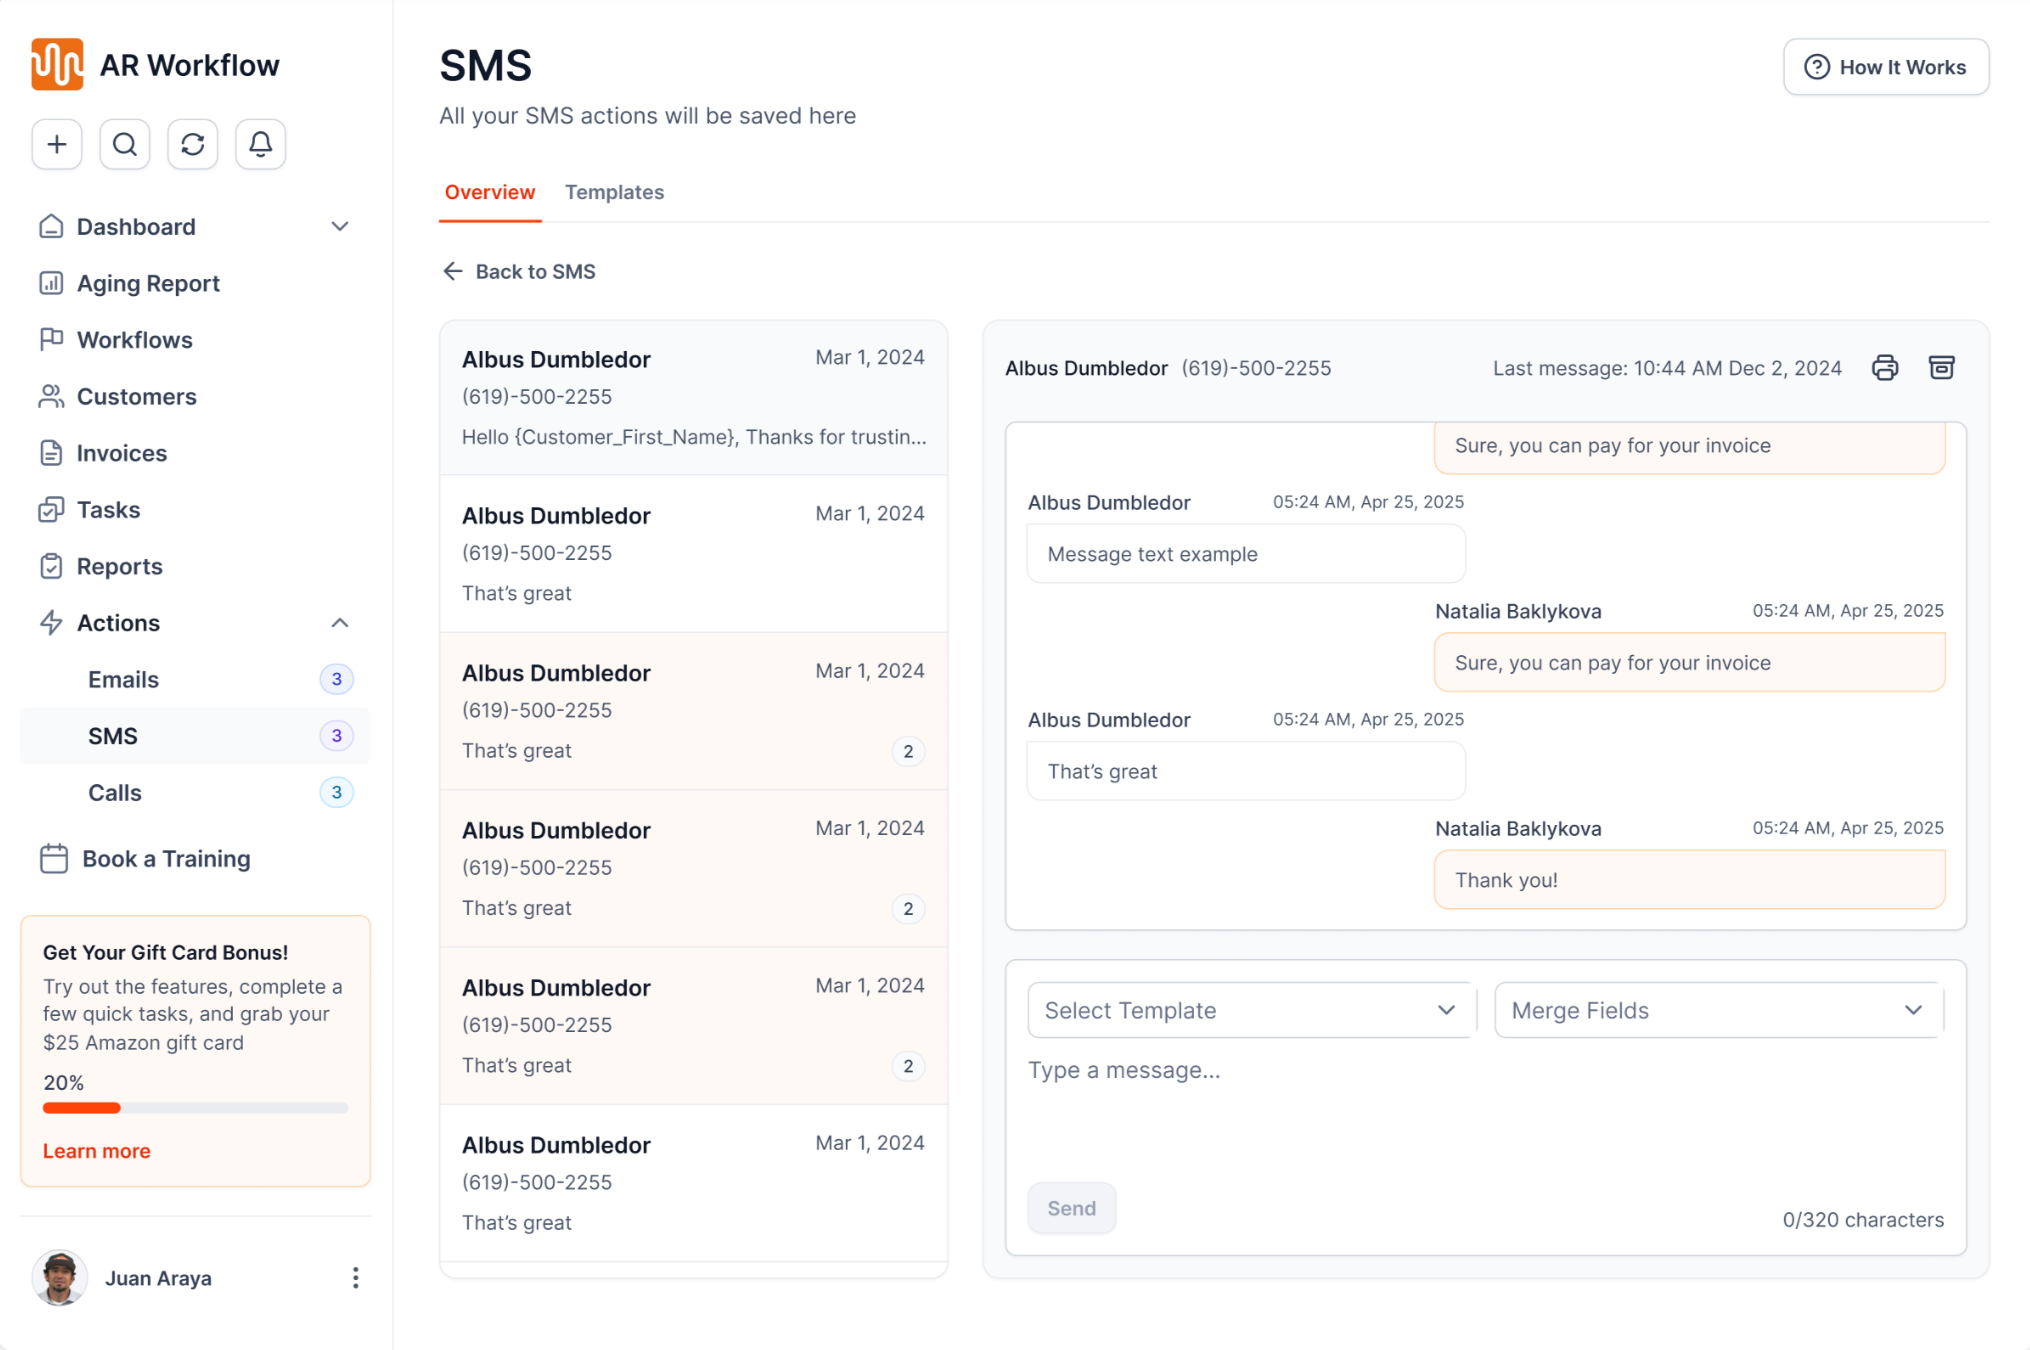
Your team can also set up collection workflows that automate email and SMS follow-ups, so keeping up with unpaid invoices doesn't depend on someone remembering to send another message.
When a customer is ready to pay, AR Workflow also provides online payment options that make it easier for them to complete payment.
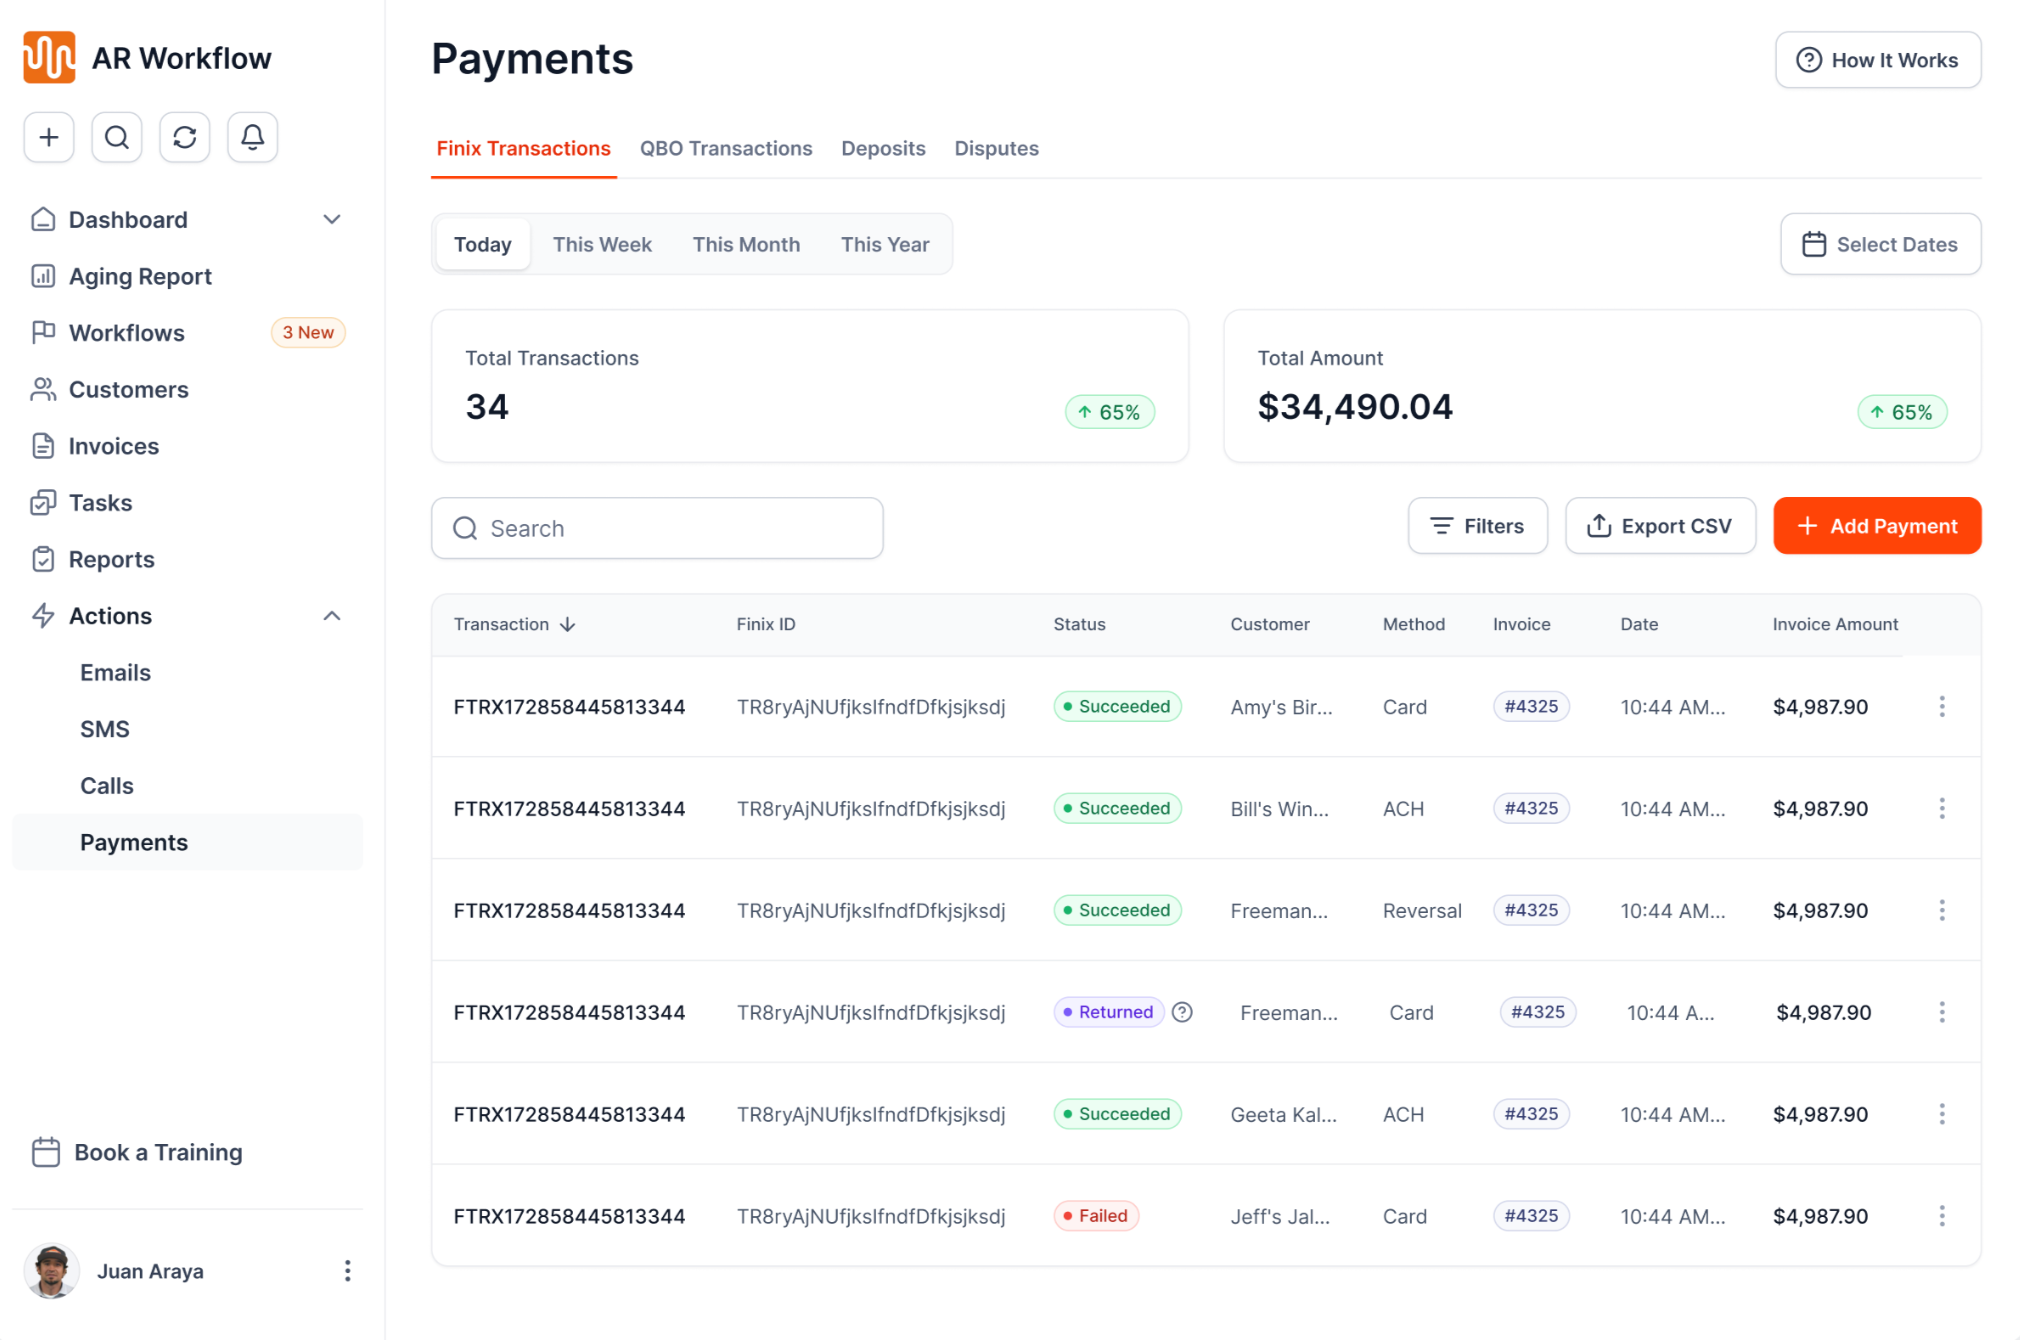
This helps your team spend less time manually checking invoices and chasing balances while still keeping the collection process moving.
You still control how your company handles each account, but the routine work involved in staying on top of outstanding invoices doesn't have to take as much of your team's time.
Collect Your Mitigation Invoice Payments Faster With AR Workflow

Getting your mitigation invoice right from the start can save your team from spending more time fixing charges or tracking down missing information later. But even a properly prepared invoice can still sit unpaid after you send it.
At that point, the priority shifts from preparing the invoice to staying on top of the money you're still owed.
AR Workflow helps restoration companies do that by keeping outstanding invoices visible and making it easier to stay consistent with collection follow-ups even when the team has other work demanding its attention.
That means less time manually keeping track of unpaid invoices and a clearer path toward collecting the revenue you've already earned from completed mitigation work.
The sooner you can turn that finished work into collected payment, the sooner that money can go back into keeping your restoration business moving.
FAQs About Mitigation Invoice
What is a mitigation payment?
A mitigation payment is money paid toward services performed to limit or address property damage after a loss. Depending on the situation, payment may involve the homeowner, an insurance company, or another party involved in the claim.
What are the three types of invoices?
Common examples include standard invoices, recurring invoices, and final invoices, although businesses may use other invoice formats depending on how they bill customers.
Does insurance pay for mitigation?
Insurance may cover mitigation work if the loss and services fall within the applicable policy coverage.
What does it mean to dispute an invoice?
Disputing an invoice means questioning or disagreeing with part or all of the amount being billed.
The disagreement might concern a particular charge, the work performed, the amount due, or another part of the bill. Clear line items and job documentation can help the parties identify exactly what is being questioned so the issue can be addressed based on the records available.
Why do water mitigation invoices sometimes differ from the original estimate?
Water mitigation invoices can differ from the original estimate because the full scope of a water loss may become clearer as the mitigation work progresses. Moisture can extend into materials or areas that were not fully apparent during the initial assessment, which may require additional work.